Hot Fix Crystal Rhinestones for Skating Costumes: Step-by-Step Guide to a Pro Finish

A skating costume can be beautifully cut and perfectly fitted, but the sparkle is what catches the arena lights. Rhinestones help define movement, highlight choreography, and make a costume read from the judges’ side of the rink or the back row of a theater.
Hot fix crystal rhinestones are a favorite for performance costumes because they come with heat-activated adhesive already on the back. When applied well, they create a clean, secure finish without messy glue trails. When applied poorly, they can shift, dull the fabric, or pop off during a spin, jump, lift, or quick change.
The difference comes down to planning, fabric prep, heat control, and patience. This guide walks through the full process, from choosing stones to maintaining them after the final bow.

Choose rhinestones that suit the costume and the performance
Not every rhinestone is right for skating or performance wear. Costumes stretch, move, brush against the body, and face sweat, cold rink air, garment bags, and repeated handling. Stones need to look brilliant and stay attached.
Common rhinestone types for costumes
Rhinestone type | Best use | What to know |
Hot fix crystal rhinestones | Stretch costumes, mesh sleeves, bodices, appliqués | Heat activates the glue backing. They are clean to apply and great for detailed patterns. |
Flat back non-hot fix stones | Delicate fabrics or places where heat is risky | These need separate adhesive. They allow more glue control but take longer to cure. |
Sew-on stones | Large focal points, shoulder accents, waist details | Holes allow stitching for extra security. They add more weight than small flat backs. |
Resin rhinestones | Budget-friendly practice costumes or large coverage areas | They are lighter but usually less brilliant than glass crystal. |
Crystal pearls or cabochons | Soft designs, ballet-inspired looks, vintage costumes | They add texture more than flash and work well blended with crystals. |
For competitive skating, glass crystal is usually the best choice for maximum light return. Acrylic and resin stones can work for youth costumes, theater groups, or budget-heavy designs, but they do not sparkle as sharply under arena lighting.
Pick the right size
Rhinestones are often sized in `ss`, which stands for stone size. Smaller stones work well for shading and fine curves. Larger stones create impact from a distance.
A helpful costume mix might include:
SS6 to SS10
Fine details, lace edges, tiny swirls, and close-set gradients.
SS12 to SS16
General costume work, scattered sparkle, and sleeve designs.
SS20 to SS30
Bold focal points on the bodice, neckline, waist, or appliqués.
Large stones can look dramatic, but too many can weigh down stretch fabric. On skating costumes, balance matters. The costume should sparkle without changing how the skater feels in the air or across the ice.
Understand finishes
Clear crystal gives a clean, icy flash. AB, short for aurora borealis, has an iridescent coating that reflects rainbow tones. AB stones are especially popular on skating costumes because they catch rink lights from many angles.
For a more polished design, mix finishes with intention:
Clear crystal on white, black, navy, and jewel tones for a crisp effect.
AB crystal for maximum shimmer on cool colors, pastels, and white.
Color-matched stones for elegant depth without high contrast.
A few larger accent stones to guide the eye to the neckline, waist, or movement line.
Prepare the costume before placing a single stone
Good rhinestone work starts with a clean, stable surface. Stretch fabrics can shift, mesh can snag, and velvet can crush if handled roughly. Take time here, because prep prevents most application problems later.

Wash or clean the fabric if possible
Fabric finishes, oils from hands, makeup, and lint can weaken adhesion. If the costume is still in progress, clean the fabric before stoning according to the fabric care needs. If the costume is finished and cannot be washed, gently remove lint and surface dust with a lint roller or clean cloth.
Avoid fabric softener before applying rhinestones. It can leave a coating that makes it harder for glue to bond.
Test on a scrap
Always test first. Use a scrap of the same fabric, lining, mesh, or appliqué. If no scrap is available, test in a hidden area.
Check for three things:
Does the fabric tolerate heat?
Does the adhesive bond after cooling?
Does the stone sit cleanly without sinking, tilting, or leaving a mark?
Stretch mesh, illusion fabric, velvet, foil fabrics, and metallic prints need extra care. Some can scorch, melt, or lose surface finish under direct heat.
Stabilize the costume
A costume is not a flat poster. It curves around the body, stretches over seams, and expands during movement. That means the design should be placed under realistic tension.
For bodices, place the costume on a dress form when possible. If the garment will stretch significantly when worn, lightly stretch the stoning area before marking and applying. This helps prevent gaps or puckers later.
For sleeves, lay a pressing ham, rolled towel, or sleeve board inside the fabric. For mesh panels, use a nonstick pressing sheet or parchment paper underneath so adhesive does not seep through and stick to the back layer.
Gather the right tools
A smooth setup keeps the work clean and calm. Useful tools include:
Hot fix applicator with tips that match stone sizes
Fine tweezers
Wax pencil or pickup tool
Parchment paper or a heat-safe nonstick sheet
Chalk pencil, washable marker, or fine tailor’s pencils
Small trays for sorting sizes and colors
Heat-resistant surface
Cotton cloth for gentle pressing when needed
Good lighting
A household iron can work for some flat areas, but it gives less control than a rhinestone applicator. For curved costume sections, small designs, and mixed stone sizes, an applicator is usually easier and safer.
Plan the placement like a costume designer
The best rhinestone layouts support the shape of the costume and the movement of the performer. Random sparkle can look pretty up close, but intentional sparkle looks professional under performance lighting.
Start with the performance lines
Look at the costume from a distance. Ask where the eye should travel.
Common strong points include:
Neckline
Shoulder line
Waist or diagonal bodice seam
Appliqué edges
Sleeve cuffs
Skirt hem
Back details seen during spins
One dramatic focal point, such as a waistburst or shoulder cluster
Skating costumes often look best when the stones follow movement. A diagonal line can lengthen the body. A spray from the hip can enhance rotation. Stones around the neckline can frame the face without overloading the costume.
Mark the design lightly
Use a marking tool that suits the fabric. Chalk works well on many dark fabrics. Washable markers can work on lighter fabrics, but they must be tested first. Avoid heavy pencil marks on mesh or pale fabrics.
For symmetrical designs, mark center front, center back, waistline, and key seams. Then place stones on one side first and mirror the pattern on the other side.
A paper template can help with swirls, scallops, stars, snowflake shapes, or repeated motifs. Transfer dots lightly onto the fabric, then place stones over the marks.
Dry place before heating
Before applying heat, lay out a small section. Step back. Look at it under bright light. If possible, view it on the dress form.
Dry placement helps catch spacing problems early. It also helps you avoid the classic mistake of starting with dense stones in one area and running out of stones before the design feels balanced.
A professional-looking rhinestone design usually has rhythm. Dense sparkle in focal areas, open spacing through transition areas, and clean edges where the design ends.
Apply hot fix rhinestones step by step
Work in small sections. Rushing increases the chance of crooked stones, weak bonds, and heat damage.

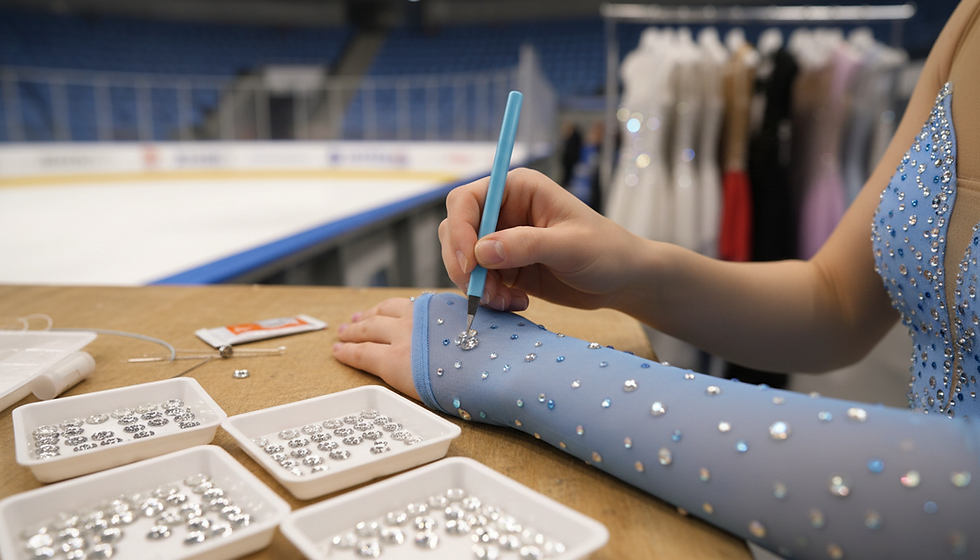
Step 1. Sort stones by size and color
Pour only a small amount into a tray at a time. Turn stones face up with tweezers or a sorting tray. Keep crystal, AB, and colored stones separate so the pattern stays consistent.
Step 2. Heat the applicator
Attach the correct tip for the stone size. Let the tool heat fully according to its instructions. A tool that is not hot enough can soften the glue without creating a full bond.
Do not guess with delicate fabric. Test the tool on a scrap before moving to the costume.
Step 3. Pick up the stone
Most hot fix tips pick up the stone by the crystal face. The stone should sit neatly in the tip, with the glue side exposed. If the tip is too large or too small, the stone may tilt or fall.
For very small stones, a wax pencil and a flat tip can give more control.
Step 4. Set the stone in place
Touch the glue side to the fabric. Hold the applicator steady for the time recommended by the rhinestone or tool maker. This is often brief, but it varies by stone size, fabric, and tool.
Use gentle pressure. Pressing too hard can spread glue beyond the edge or push the stone into soft fabric.
Step 5. Let it cool before testing
The adhesive needs time to set as it cools. Do not tug the stone right away. Move to the next stone, then come back after the area has cooled.
A secure stone should resist a light fingernail nudge. If it slides, the glue did not fully bond. Reheat carefully or remove and replace it.
Step 6. Work from the center outward
For motifs, start at the center or main line, then build outward. This keeps curves clean and spacing even. For borders, start at key anchor points, such as center front, side seams, and corners, then fill between them.
Step 7. Let the costume rest
After stoning, let the costume sit flat and undisturbed. Avoid trying it on, folding it, or packing it immediately. The bond strengthens as the adhesive fully cools and settles.
Use professional techniques for a cleaner finish
Small details make rhinestones look expensive, even when the design is simple.
Fade the spacing
A dense-to-open gradient looks polished on skating costumes. Place stones close together at the focal point, then gradually increase the space between them. This works beautifully from shoulder to sleeve, neckline to bodice, or hip to skirt.
Mix sizes with restraint
Using only one stone size can look flat. Mixing too many sizes can look busy. A clean formula is one main size, one smaller detail size, and one larger accent size.
For example, use SS16 stones for the main scatter, SS10 stones for fine edges, and SS20 stones for focal highlights.
Follow seams and appliqué edges
Rhinestones can make appliqués look integrated rather than placed on top. Add small stones along lace curves, embroidered edges, or mesh cutouts. Leave a tiny fabric border so the stones do not crowd the stitching.
Keep high-friction zones lighter
Underarms, sleeve interiors, side waist, glove contact areas, boot contact zones, and the seat of a costume see more rubbing. Heavy stones in these areas may loosen faster or feel uncomfortable.
If sparkle is needed there, use smaller stones, wider spacing, or stitched accents instead.
Check the costume from performance distance
A design that looks dramatic from 12 inches away may disappear from the stands. A design that looks subtle in the sewing room may explode under rink lighting.
View the costume from across a room. Take a quick photo or video while the costume hangs or sits on a form. This helps reveal uneven density and weak focal points.
Avoid common rhinestone mistakes
Even experienced makers run into trouble when working too fast or skipping tests.
Using too much heat
Too much heat can melt mesh, flatten velvet, distort stretch fabric, or dull some finishes. It can also cause glue to spread around the stone.
Use the right tip, follow the tool guidance, and test first.
Using too little heat
If the glue does not activate fully, stones may look attached but fall off during wear. A weak bond often shows up after the costume stretches or cools.
Let each stone heat long enough for the adhesive to bond, then let it cool before testing.
Stoning on dirty or coated fabric
Body oil, lint, fabric softener, and spray products can interfere with adhesion. Keep the costume clean and handle stoning areas with clean hands.
Placing stones too close to stretch seams
Dense stones can reduce stretch. If placed across seams that need to expand, they can pop off or restrict movement. Leave breathing room around areas that pull during jumps, spirals, lifts, or deep knee bends.
Ignoring weight
Rhinestones add weight. Large crystals, sew-on stones, and heavy clusters can change the drape of mesh, skirts, and sleeves. Build sparkle where it supports the design, not everywhere at once.
Folding the costume too soon
Fresh stones can shift if folded before cooling. Let the costume rest before storing it.
Maintain the sparkle after the costume is finished
A finished costume still needs care. Good maintenance keeps stones secure through rehearsals, competition days, and travel.

After each wear, let the costume air dry before packing it. Sweat and moisture can weaken fabric areas over time, and trapped moisture can dull the overall look.
When cleaning is needed, follow the costume maker’s care instructions. Many stoned costumes should be hand washed gently in cool water or spot cleaned. Avoid harsh scrubbing, bleach, and high heat. Do not put a rhinestoned skating costume in a dryer.
Store the costume with tissue paper between layers, especially when stones touch mesh or delicate fabric. Use a breathable garment bag for travel when possible. For heavy stoned areas, avoid tight folding. Rolling around tissue can reduce pressure points.
Before each event, do a quick stone check:
Run fingers lightly over stoned areas.
Look for tilted or loose stones.
Reapply missing stones with the same size and finish.
Pack a small repair kit with spare stones, tweezers, and adhesive for emergencies.
For repairs on heat-safe areas, a hot fix tool can reactivate the adhesive or attach a replacement stone. If the fabric is delicate or the spot is hard to heat safely, use a costume-safe rhinestone adhesive and let it cure fully before wearing.
Let the sparkle support the story
Rhinestones are more than decoration. They can sharpen a silhouette, echo music, highlight speed, and make a costume feel complete. The strongest designs start with a plan, respect the fabric, and build shine in layers.
Choose stones that suit the performance, test every fabric, work in small sections, and give the adhesive time to set. With careful preparation and a creative eye, a skating or performance costume can look polished, secure, and radiant from the first pose to the final glide.


Comments